
Give Your Home a Makeover With These Best Spring Cleaning Tips and Tricks!
Spring is a season of renewal, and I get a bit of spring fever when the weather changes from the chill of winter to the energizing warmth of spring. After being shut up all winter to stay warm, spring is the perfect time to clean. I throw open all the windows to let out the stale air and begin my room-by-room spring cleaning routine. I feel like cleaning and organizing in the spring breathes new life into my home, setting the stage for a fresh start.
I’ve put together this spring cleaning guide to help you systematically purge and organize clutter, spruce up neglected areas, and finally get to those hard-to-reach places you’ve been avoiding. Hopefully, these spring cleaning tips and tricks will inspire you to personalize and start your own spring deep cleaning routine. I’ve even created a spring cleaning checklist. This checklist can also be used for anytime deep cleaning.
RELATED POST: How to Keep Your House from Becoming Too Hot in Summer
Room-by-Room Spring Cleaning Guide
I find it very overwhelming to clean the entire house at once (and I’m pretty sure even the fastest cleaning expert can’t complete this spring cleaning checklist in one day). Therefore, one of my best spring cleaning tips is to clean one room at a time in 10-15 minute chunks, although some cleaning tasks require a little more time.
It usually takes me 2-4 weeks (depending on how much cleaning is required) to get through the list on my own time, so don’t get discouraged if it’s not all done in a day or two, or even a week. Just pick a room, do a few tasks a day and keep at it.
It’s important to remember that spring cleaning is more than just wiping down surfaces and tidying up rooms. This is a deep cleaning that will result in a sparkling clean home. Decluttering is also necessary to give your home maximum space and remove dirt and grime from storage spaces and less used areas.
Now, pick a room and get to work! Make sure you have your cleaning supplies and tools on hand.
RELATED POST: The complete list of things to declutter in your home (plus checklist!)
As an Amazon Associate I earn from qualifying purchases. This means if you click on a link and buy something I’ve recommended, I get a small commission at no additional cost to you. You can see my full Disclosure Policy here.

Bathroom
Bathrooms can be a gross part of spring cleaning. Don’t skip any of these areas to deep clean if you want to have that fresh, clean, sanitized bathroom feeling. The good news is that a bathroom can usually be deep cleaned in just a couple of hours. It’s a good place to start to build momentum to continue your springtime deep-clean routine.
Wash bathmats, towels, face cloths, shower curtain and window curtains
- Take the window and shower curtains down (if applicable) and put them in a laundry basket.
- Gather the bath mats, towels, face cloths and throw them in the basket.
- Put the load in the washing machine and start the wash cycle.
Declutter medications, beauty products, makeup and first aid supplies
- Take everything out of your medicine cabinet, bathroom drawers and cupboards
- Lay them out on the counter or table
- Throw away anything that has expired or that you don’t use or aren’t likely to use
- Wipe down surfaces of medicine cabinet, drawers and cupboards
- Clean the pipes under the sink
- Dust or wipe down items you are keeping
- Organize and put away the remaining items
Clear and disinfect the bathroom counter
- Declutter the counter
- Replace toothbrushes with new ones and clean accessories
- Clean the countertop with disinfecting cleaning wipes
- Arrange the remaining items on the counter
Clean the bathroom vent cover
- Remove the bathroom vent cover and wash it in hot, soapy water
- Vacuum bathroom vent
- Clip the cover back on
Vacuum the bathroom floor and other surfaces
- Thoroughly vacuum the floor – make sure to get all around and behind toilet
- Vacuum the rim of the bathtub and/or shower door crevices
Clean bathroom light fixtures
- Remove and wash bathroom light fixtures
- Wipe down light bulbs
Clean and disinfect the outside of cabinets, knobs, towel racks, light switches, electrical outlets and toilet paper holder
- Use disinfecting cleaning wipes to clean and disinfect the outsides of bathroom cabinets, knobs, towel racks, light switches, electrical outlets and toilet paper holders.
Clean bathroom ceilings, walls, baseboards and door frames
- Clean bathroom ceilings, walls and baseboards with a Swiffer Sweeper and a wet microfiber cloth to easily reach high corners
- Wipe down door frames
Clean the grout
- Clean tile grout
Clean bathroom sink
- Clean the sink with disinfecting cleaning wipes
- Clean and descale faucets and taps
Clean the bathtub or shower (or both)
- Remove all products from ledges and shelves
- Wet bathtub or shower with hot water
- Spray with your choice of shower and bathtub cleaner and let sit.
- If you have hard water deposits, rust stains or excessive soap scum, use this secret ingredient
- Clean shower doors, if applicable
- For mold or mildew, remove with hydrogen peroxide
- Scrub the tub, faucet and handles.
- Give your bathtub or shower a final rinse with clean, hot water
- Dry with clean towel
- Replace products
Clean the toilet
- Squirt toilet cleaning product into bowl.
- Use disinfecting cleaning wipes to clean the rim, seat and toilet cover (both sides).
- Clean behind the seat and hinges.
- Clean the outside of the bowl and base
- Clean the top and outside of the tank
- Disinfect the flushing handle and underneath the back of your toilet
- Clean the inside of the toilet
- For stubborn rust stains or mineral deposits in your toilet bowl, use this cleaning hack
Clean mirrors, windows, window sills and window tracks
- Thoroughly clean the mirrors, windows, window sills and window tracks
- Spray mirrors and windows with Windex Glass Spray and wipe dry
Clean and disinfect wastebasket
- Empty and clean the wastebasket
Wash and disinfect the bathroom floor
- Mop and dry the floor
- Disinfect the floor by spraying undiluted hydrogen peroxide on the dry floor
- Let sit until almost dry then wipe with a clean, wet cloth
RELATED POST: 3 Simple DIY disinfectant sprays that work!
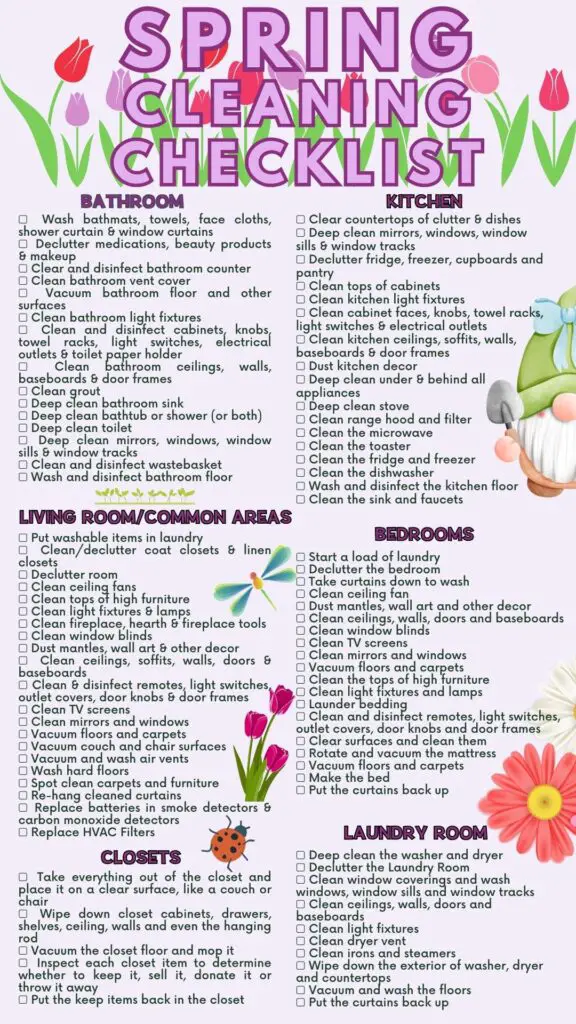
Kitchen
The kitchen is the heart of your home and can be the dirtiest. We spend so much time in the kitchen cooking, washing dishes, surface cleaning and replenishing groceries, it’s hard to remember to clean everything else.
I find cleaning the kitchen to be the most labor intensive room in the house. I usually dedicate at least 8-10 cleaning hours to this cleaning challenge over several days.
Clear countertops of clutter and dishes
- Clear countertop clutter and put rarely used items away
- Clean and put away dishes. If you’re overwhelmed with dirty dishes, here’s some dishwashing hacks for people who hate washing dishes
Clean mirrors, windows, window sills and window tracks
- Remove curtains and wash them
- Clean mirrors, windows, window sills and window tracks
Declutter the fridge, freezer, cupboards and pantry
- Take everything out of each space – one space at a time
- Throw away, sell or donate anything you don’t want or need – be ruthless
- Clean all shelves and drawers in the space
- If the fridge or freezer has any bad odors, here’s how to remove stinky smells from your fridge or freezer
- Return and arrange the items you will keep in the space
Clean the tops of cabinets and appliances
- Dust or vacuum the tops of cabinets
- Clean the area if there is any greasy grime. Rubbing alcohol will cut right through it, but don’t use on painted or finished surfaces – use hot soapy water instead
Clean kitchen light fixtures
- Remove and wash light fixture covers or clean them with a damp cloth
- Clean lightbulbs
- Replace the light covers
Clean cabinet faces, knobs, towel racks, light switches, electrical outlets
- Clean the outsides of kitchen cabinets, knobs, towel racks, light switches, electrical outlets and toilet paper holders.
Clean kitchen ceilings, soffits, walls, baseboards and door frames
- Clean kitchen ceilings, soffits, walls and baseboards with a Swiffer Sweeper with a wet microfiber cloth to reach into high corners
- Clean the door frames
Dust kitchen decor
- Dust decorations, pictures and other assorted decor or wash them if grimy
Under and behind all appliances
- Move your appliances
- Vacuum floor
- Vacuum the condenser coils
- Clean back of appliances
- Mop floors
Stove
- Vacuum the bottom of the oven
- Run the self cleaning option if you have it. If not, deep clean the oven with oven cleaner – here’s a more environmentally friendly option
- Clean the top of your stove. Here’s how to clean your ceramic glass top stove if you have one.
- Clean grates or drip pans
- Clean exterior stove surfaces
- Buff with a clean, dry cloth
Clean range hood and filter
- Remove filter and clean
- Clean the range hood and fan blades
- Rinse and buff dry
Clean the microwave
- Place a bowl of water in the microwave and use the high setting until boiling
- Wipe out the interior of the microwave
- Clean the exterior of the microwave
- Buff dry
Clean the toaster
- Unplug the toaster
- Shake it upside down over the trash can
- Clean the interior of the toaster – use a damp toothbrush for harder to reach areas.
- Let the toaster dry for at least 3 or 4 hours before putting it back together and plugging it in
Clean the fridge and freezer
- Clean the exterior of your fridge
- Buff to remove streaks
Clean the dishwasher
- Fill the detergent cup with citric acid, close it, and run a normal cycle without any dishes
- Clean the exterior of the dishwasher
- Buff to remove streaks
Wash and disinfect the kitchen floor
- Thoroughly vacuum the kitchen floor
- Mop the kitchen floor
- Rinse with clean hot water and let dry
- Disinfect with undiluted hydrogen peroxide spray and let sit for 10-15 minutes
- Wipe the floor dry
Clean the sink and faucets
- Fill the sink up with hot water and add ¼ cup of citric acid.
- Let it sit for 10 minutes
- Scrub the sink, including the drain
- If you have a garbage disposal, pour 1/2 cup of baking soda into the drain, followed by a cup of white vinegar. Let it sit for 10 minutes. Turn on the hot water to rinse away the baking soda mixture. You could also use chopped citrus peels instead of the vinegar/baking soda mixture.
- Clean and descale faucets and taps
- Buff with a soft cloth or paper towel
RELATED POST: How to clean baseboards without bending over: 13 Easy Ways
Living room and other common rooms
Common areas are rooms like living rooms, dining rooms, family rooms, entry ways and hallways that are frequently shared with other members of the household. Depending on the room, getting through this spring deep cleaning checklist should take anywhere between 4-8 hours.
Pick one room and work through the spring deep cleaning checklist. Repeat for each additional common room.
Put washable items in the laundry
- Gather all washable items in a basket
- Start a load of laundry before decluttering the room
Coat closets and linen closets
- Take everything out of the closet and place it on a clear surface, like a couch or chair
- Wipe down closet cabinets, drawers, shelves, ceiling, walls and even the hanging rod
- Vacuum the closet floor and mop it
- Inspect each closet item to determine whether to keep it, sell it, donate it or throw it away before you return it to the closet
Declutter the room
- Take everything out of each shelf, cabinet or drawer
- Sell, donate or throw away anything that isn’t needed
- Do the same with your knickknacks and decorative items.
- Clean the space you just emptied, including shelves and drawers
- Put the items you will keep back in the space
- Take a look around the room and determine if you can get rid of anything else
Clean Ceiling Fans
- Use a Swiffer Duster with an extendable handle to clean each fan blade
Clean the tops of high furniture
- Dust the tops of high cabinets and bookshelves with a Swiffer Duster with an extendable handle
Clean light fixtures and lamps
- Remove and wash light fixture covers or clean them with a damp cloth
- Clean lightbulbs
- Replace light covers
- Wipe down lamp bases and use a lint roller to clean the lampshades.
Clean fireplace, hearth and fireplace tools
- Sweep ashes into a can
- Vacuum the remaining ashes
- Clean the hearth
- Clean fireplace grate and tools
Clean window blinds
- Vacuum the blinds
- Set the blinds completely down and use a damp cloth to gently clean the slats
- Set the blinds completely up and use a damp cloth to gently clean the slats
Dust mantles, wall art and other decor
- Run a duster over each item on the wall to clean it
- Remove items from the wall, if possible, in preparation for the next step
Clean ceilings, soffits, walls, doors and baseboards
- Clean ceilings, soffits, walls and baseboards with a Swiffer Sweeper with a wet microfiber cloth to reach into high corners
- Clean the door frames
- Put wall art and other decor back on the wall
Clean and disinfect remotes, light switches, outlet covers, door knobs and door frames
- Clean remotes, light switches, outlet covers, door knobs and door frames in the room with disinfecting cleaning wipes
Clean TV screens
- Dust the screen with your duster
- Use these iCloth Screen Cleaning Wipes to safely clean screens
Clean mirrors and windows
- Vacuum window tracks and window screens
- Clean the mirrors, windows and window tracks
Vacuum floors and carpets
- Vacuum all floors and carpets
- Move large furniture and vacuum underneath and behind it
- Vacuum stairs if there are any
Vacuum couch and chair surfaces
- Pull off the couch cushions if you can
- Vacuum the entire couch surface
- Replace cushions and vacuum the tops
- If you can’t remove cushions, vacuum in between and behind them
Vacuum and wash air vents
- Remove vent covers and clean
- Vacuum out vents
- Place vent covers back on the air vents
Wash hard floors
- Thoroughly mop floors
- Rinse with clean water
- Let dry
- If you have special flooring, follow manufacturers’ directions for washing
Spot clean carpets and furniture
- Use this Rug Doctor Pet Portable Spot Cleaner to remove pet and human stains from carpeting and furniture
- If you don’t have a spot cleaner, spot clean using hydrogen peroxide and the blotting method
Re-hang cleaned curtains
- Hang curtains immediately after cleaning.
- Wrinkles can be removed with the Electrolux Portable Handheld Garment & Fabric Steamer
Replace batteries in smoke detectors & carbon monoxide detectors
- Put fresh batteries in your smoke detectors and carbon monoxide detectors
Replace HVAC Filters
- Change your HVAC filters according to manufacturer’s instructions
Bedrooms
Sleep is crucial to optimal physical and mental health and the bedroom should be a calm and relaxing space to retreat to. It’s hard to be calm and relaxed when the closet is jammed full of clothes and shoes, clothes are hanging out of dresser drawers, dirty dishes are piled on your bed, and various items are strewn around the room.
Depending on how long it takes you to declutter, you should be able to complete the bedroom portion of your spring cleaning in 4-8 hours per bedroom, including laundry time. More time will be needed if you need to do extensive decluttering. Here’s how to deep clean the bedroom and get that calming feeling that comes from a clean bedroom.
Start a load of laundry
- Gather all clothing, towels, and other dirty washable items in a laundry basket
- Take it to the laundry room, put it in the washing machine and start the washing cycle
Declutter the bedroom
- Take everything out of the closet and place it on the bed
- Wipe down closet cabinets, drawers, shelves, ceiling, walls and even the hanging rod
- Vacuum the closet floor and mop it
- Inspect each closet item to determine whether to keep it, sell it, donate it or throw it away before you return it to the closet
- Move on to dresser drawers and night tables
- Empty one drawer at a time onto the bed
- Wipe down the inside of each drawer
- Inspect each item before you return it to the drawer to determine if you should keep it, sell it, throw it away or donate it
- Repeat the process for all the drawers
- Take a look around the room and see what else you can declutter
- Remove all items that don’t belong in the room and put them away
Take curtains down to wash
- Take your curtains off the curtain rod and put them in the washing machine or get them ready to take to the dry cleaner
- Flip the original load of clothing from the room to the dryer
Clean ceiling fan
- Clean your ceiling fan with an extendable Swiffer duster.
Dust mantles, wall art and other decor
- Run a duster over each item on the wall to clean it
- Remove items from the wall, if possible, in preparation for the next step
Clean ceilings, walls, doors and baseboards
- Use a lightweight Swiffer Sweeper with a damp microfiber cloth to clean ceilings, walls, doors and baseboards
- Put decorative items back on the walls
Clean window blinds
- Vacuum the blinds
- Set the blinds completely down and use a damp cloth to gently clean the slats
- Set the blinds completely up and use a damp cloth to gently clean the slats
Clean TV screens
- Dust the screen with your duster
- Use these iCloth Screen Cleaning Wipes to safely clean screens
Clean mirrors and windows
- Vacuum window tracks and window screens
- Clean the mirrors, windows and window tracks
Vacuum floors and carpets
- Vacuum all floors and carpets
- Move large furniture and vacuum underneath and behind it
- Vacuum stairs if there are any
Clean the tops of high furniture
- Dust the tops of high cabinets and bookshelves with a Swiffer Duster with an extendable handle
Clean light fixtures and lamps
- Remove and wash light fixture covers or clean them with a damp cloth
- Clean lightbulbs
- Replace light covers
- Wipe down lamp bases and use a lint roller to clean the lampshades
Launder bedding
- Strip the bed completely
- Put sheets, pillows, pillow cases, mattress cover, comforter, etc. in a laundry basket and bring it to the laundry room
- Start a load then return to the bedroom with the clothes from the dryer
Clean and disinfect remotes, light switches, outlet covers, door knobs and door frames
- Clean remotes, light switches, outlet covers, door knobs and door frames in the room with disinfecting cleaning wipes
Clear surfaces and clean them
- Take everything off dressers, shelves and night tables
- Wipe down knick knacks before placing them on the bed
- Clean and dust the surfaces
- Allow time to dry and then place items back on surfaces
Rotate and vacuum the mattress
- Vacuum the mattress
- Rotate the mattress
- If your mattress doesn’t have a topper, you can also flip it
- If you have flipped the mattress, vacuum it again
- Spot remove stains
- If the mattress has an unpleasant odor, sprinkle baking soda liberally all over the surface. let it sit and then vacuum
Vacuum floors and carpets
- Vacuum all floors and carpets
- Move large furniture and vacuum underneath and behind it
Make the bed
- Cover the bed with a mattress cover
- Put the fitted sheet on the bed
- Put the top sheet on if you use one
- Put the comforter or duvet on
- Put the pillow cases on the pillows, fluff them up and place them on the bed
Put the curtains back up
- Hang curtains immediately after cleaning.
- Wrinkles can be removed with the Electrolux Portable Handheld Garment & Fabric Steamer
Now that everything’s been cleaned and put away, it’s time to enjoy your sanctuary!
Laundry Room
Most of us don’t think about cleaning our laundry room very often, but it’s the room that gathers the most dust – it’s everywhere! My partner does the laundry, so empty detergent bottles and used dryer sheets have a way of collecting in mine, making a laundry deep clean a spring cleaning necessity. I usually spend 2-4 hours cleaning the laundry room.
Deep clean the washer and dryer
Declutter the Laundry Room
- Get rid of anything that shouldn’t be in there
- Make sure the top of the washer and dryer are clear.
- Take everything out of shelves or cabinets, one at a time, and place it on the top of the washer and dryer.
- Wipe down each laundry cabinet and door, drawer, and shelf as you go.
- Inspect everything before you put it back and determine if you want to keep it, trash it, donate it or sell it.
Clean window coverings and wash windows, window sills and window tracks
- Take curtains down and, if they’re washable, put them in the washing machine. If not, hang them outside in the sunshine
- Run a wash cycle.
- If you have blinds, vacuum them
- Set the blinds completely down and use a damp cloth to gently clean the slats
- Set the blinds completely up and use a damp cloth to gently clean the slats
- Wash window sills and window tracks. Vacuum tracks first if excessively dirty.
- Wash and dry the windows
Clean ceilings, walls, doors and baseboards
- Laundry rooms are prone to excessive dust, so sweep ceiling, walls doors and baseboards before moving on to the next step
- Use a lightweight Swiffer Sweeper with a damp microfiber cloth to clean ceilings, walls, doors and baseboards
Clean light fixtures
- Remove and wash light fixture covers or clean them with a damp cloth
- Clean lightbulbs
- Replace light covers
Clean dryer vent
- Pull the dryer away from the wall
- Locate the dryer vent on your dryer and disconnect the duct
- Pull out all the lint you can by hand and discard it
- Vacuum the lint from the duct
- Reconnect the duct
- Locate the outside vent for the dryer, remove it and wash it
- Vacuum the duct from the outside
- Replace the vent cover
- Move the curtains from the washer to the dryer
Clean irons and steamers
- Clean irons and steamers
- Wipe the base of the iron and steam vents with a paper towel
Wipe down the exterior of washer, dryer and countertops
- Clean the exterior of your washer, dryer and countertops
- Vacuum dust from the back of the appliances
Vacuum and wash the floors
- Vacuum the floors
- Mop the floors
- Rinse the floors
- Allow to dry
Put the curtains back up
- Hang curtains immediately after cleaning.
- Wrinkles can be removed with the Electrolux Portable Handheld Garment & Fabric Steamer
Have a spring cleaning garage sale
After following this spring cleaning list, it’s time to have a garage sale. You have cleaned and decluttered your entire home and now is the time to get rid of everything.
I hope this list has helped tame the overwhelm that comes with deep cleaning. When you only tackle a few items a day, they become much more manageable. Before you know it, you’ve worked your way through the list.
